BYODS (Bring Your Own Data Source) in Dirigible - Part I: Custom Data Sources setup
Starting with version Dirigible 2.2 M3, it is possible to register multiple custom data sources alongside with the default, system one. This feature allows keeping Dirigible system data completely separate from application data. And now application developers can create applications that span across multiple data sources. Both of these bring much more sense of production-readiness than ever before.
In this Part I of our series dedicated to the new feature, we explore in details how a Service Provider would setup Dirigible for multiple data sources and how Operators and App Developers would benefit using Dirigible’s database related tools and programming model. In the next parts of the series, we are going to see more topics related to custom data sources in Dirigible, such as how to extend the set of supported data sources, which currently consists of MySQL, PostgreSQL, Derby, SAPDB, SAP HANA DB and MongoDB, and more.
Part I: Custom Data Sources setup
A zero-to-hero, complete setup of a new Data Source in Dirigible consists of the following simple steps:
- Provision JDBC driver and Data Source classes to the runtime
- Bind a configured Data Source to JNDI
- Configure a reference to the JNDI-bound Data Source resource in Dirigible
- Register the Data Source with Dirigible IDE to make it available to its features
This is the short story. Let us follow this process in details step-by-step and in more detail.
Our setup will be a Dirigible web application deployed in a Tomcat web container and a PostgreSQL data source that will be provisioned along with the default Derby data source.
Step 1: Provision JDBC drivers classes
Supply a copy of PostgreSQL JDBC drivers jar into the <TOMCAT_HOME>/lib directory of the Tomcat hosting Dirigible.
On this stage: The PostgreSQL JDBC driver classes can be loaded by web applications, including Dirigible deployment on this Tomcat instance.
Step 2: Bind a Data Source to JNDI
This is a web container and JDBC driver specific step. Modify <TOMCAT_HOME>/conf/context.xml to add a Resource tag:
    <Context>
    …
      <Resource name="jdbc/PostgreSQL" auth="Container"
                type="javax.sql.DataSource"
                driverClassName="org.postgresql.Driver"
                url="jdbc:postgresql://127.0.0.1:5432/<DB_NAME_HERE>"
                username="<YOUR_USER_HERE>" password="<YOUR_PASSWORD_HERE>"/>
    …
    </Context>
Note: Remember to change the placeholders in this example with actual values.
Consult with the Postgre JDBC driver documentation for further details including on setting up for Tomcat. Tomcat’s documentation also has a dedicated section on setting up a JDNI javax.sql.DataSource with PostgreSQL.
On this stage: We have setup a JNDI javax.sql.DataSource instance named jdbc/PostgreSQL that can be looked up and is fully capable of producing connections to a PostgreSQL database as defined by its parameters.
Step 3: Configure an application reference to the JNDI-bound Data Source resource
There are two approaches at this goal serving different use cases. One of the use cases is when Dirigible’s runtime environment is not managed. In that case, the required configuration details are entered in Dirigible’s web.xml and this is the case that we shall review in more detail here. The other case is when the runtime environment is managed for e.g. automatic system provisioning. In that case the required configuration can be provided with environment variables (and of course this approach can be used also for unmanaged environments). We shall dedicate a blog on this in future.
Locate Dirigible’s web.xml descriptor file and open it for edit. In web.xml, locate the section with the tag <servlet id="bridge"> and scroll down to its set of init-param tags. Add the following block:
    <init-param>
        <param-name>jndiCustomDataSource-postgre</param-name>
        <param-value>java:comp/env/jdbc/PostgreSQL</param-value>
    </init-param>
Make sure to use the prefix “jndiCustomDataSource-“ in param-name exactly as is, case sensitive. The suffix postgre will be used as identity for this resource in the next step.
Notice, the construction of the string in the param-value. The pattern is to add the prefix java:comp/env to the name of the JNDI javax.sql.DataSource resource we defined in the previous step in context.xml. In our case this is the string jdbc/PostgreSQL.
On this stage: We have setup Dirigible to lookup a named javax.sql.DataSource from JDNI and make it available to its features.
Step 4: Register the Data Source in Dirigible injected API
Note: Before proceeding, make sure that Tomcat is restarted if it was online when previous steps were accomplished, or start it now if it was offline.
Open Dirigible IDE and select Window > Preferences from its menu:

In the dialog that pops up, locate Data Sources in the list on the left, and then click the button New…

Fill in the pop up as suggested by the screenshot below:

Finally, confirm all dialogs.
On this stage: The PostgreSQL javax.sql.DataSource is available for the Dirigible Injected API and Database tools.
Verify results
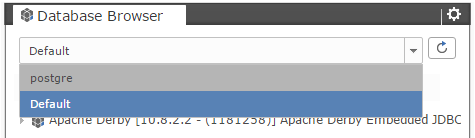
It is time to reap what we sow now. We shall now step in the shoes of an Operator or a Developer and use Dirigible’s Database perspective tools with our new data source. Click to expand the dropdown in the Database Browser view and voilà, we’ve got a brand new additional data source called postgre:
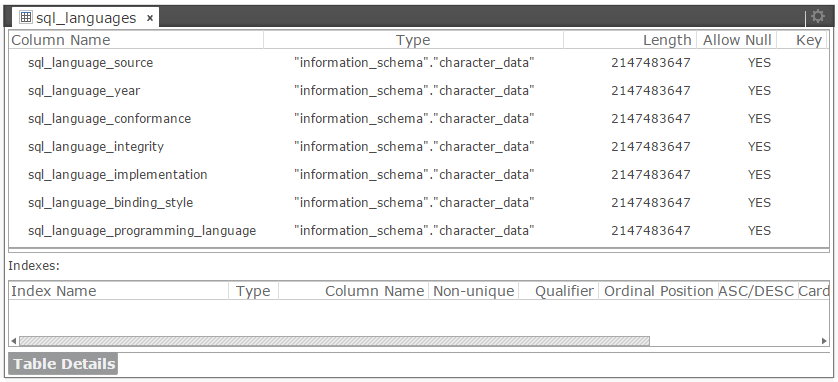
Let’s explore it like we do with the default one. Drill down its contents and select the table information_schema.sql_languages. Right-click on it and choose Open Definition from the context menu:

Find the result in Table Details:
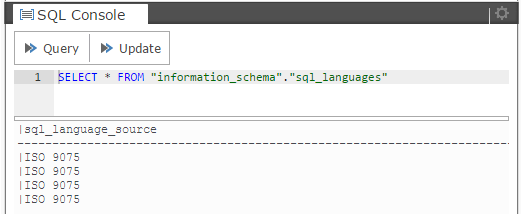
Now right-click on the table again and select Show Content from the context menu. Find the result in SQL Console:
Now, let’s try how we can benefit from the new data source programmatically. Follow the implementation steps described in this dirigible sample to create a scripting service that uses the InjectedAPI to get a reference to our custom data source and print some results. Use the following source for the service:
    /* globals $ */
    /* eslint-env node, dirigible */

    $.getResponse().setContentType("text/html; charset=UTF-8");
    $.getResponse().setCharacterEncoding("UTF-8");

    var ds = $.getNamedDatasources().get("postgre");

    var conn = ds.getConnection();
    try {
        var stmt = conn.createStatement();
        var rs = stmt.executeQuery("select * from \"information_schema\".\"sql_languages\"");
        $.getResponse().getWriter().println('SQL language variants<br>');
        while (rs.next()) {
            $.getResponse().getWriter().println(rs.getString(1) + '-' + rs.getString(2) + '<br>');
        }
    } finally {
       conn.close();
    }

    $.getResponse().getWriter().flush();
    $.getResponse().getWriter().close();
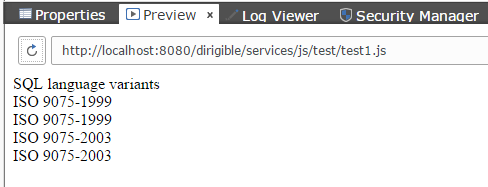
The printed results look like that:
What is next?
Now that you know how to quickly onboard a data source for a database supported by Dirigible out-of-the-box, you might want learn how to approach the rest that are available out there. That is the topic of the next blog in the series.