Amazon Quantum Ledger Database with Eclipse Dirigible
In this blog you will learn how to use Amazon Quantum Ledger Database within Eclipse Dirigible projects.
What is QLDB?
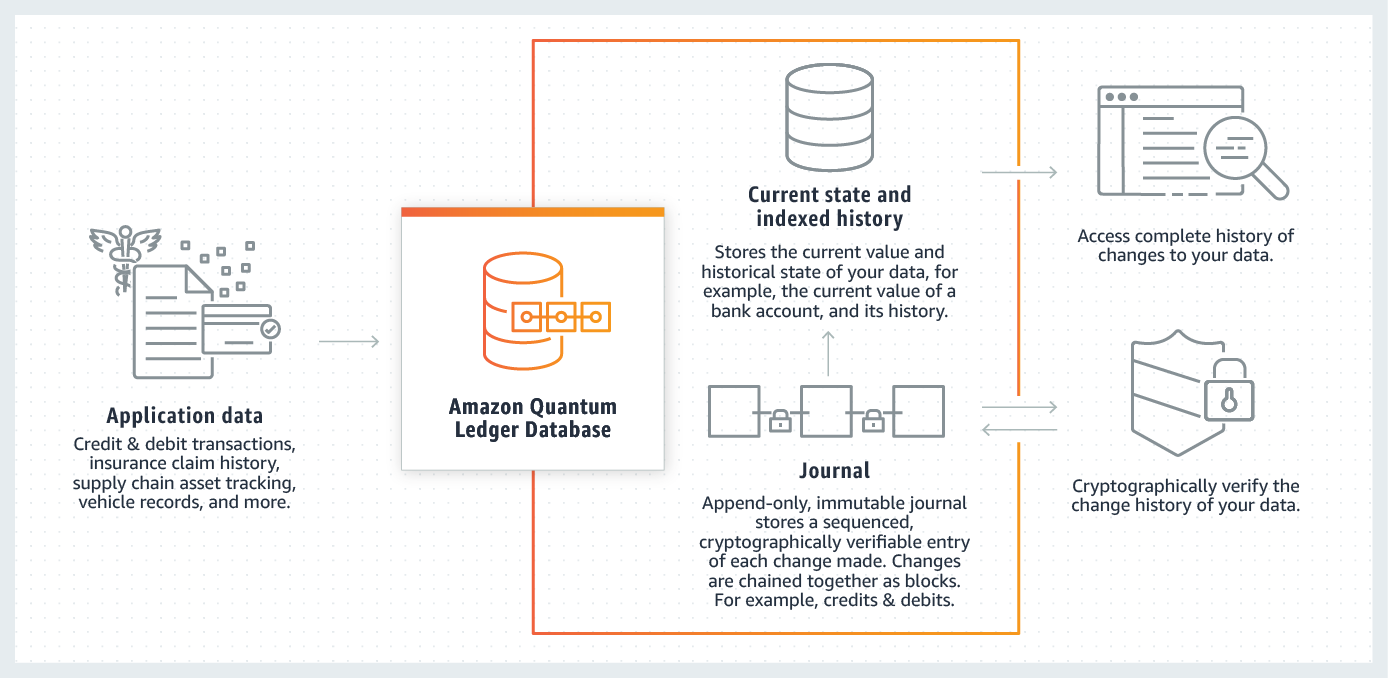
Amazon Quantum Ledger Database (QLDB) is a fully managed database running over a ledger that provides a transparent, immutable, and cryptographically verifiable transaction log.
What is the QLDB Repository API and why is it useful for Eclipse Dirigible projects?
The QLDB Repository API in Eclipse Dirigible adds a clean and low code JavaScript interface for work with AWS QLDB. It simplifies it's use and allows Eclipse Dirigible projects to use QLDB's secure transaction log to store many different kind of critical data. Such as, financial transactions or in supply chain systems to store transactions and details of every batch manufactured, shipped, stored, and sold from facility to store. See more use cases at AWS QLDB and AWS QLDB FAQs.
What are the limitations when using QLDB?
Although QLDB automatically scales to support the demands of your application and you don't need to worry about provisioning capacity or configuring read and write limits, there are some limits that you might want to read Quotas and limits in Amazon QLDB and Amazon QLDB endpoints and quotas.
Setup AWS Account with QLDB Enabled
- Sign up for AWS or use an existing account.
Create AWS IAM User
To create AWS Identity and Access Management (IAM) user, sign in to the IAM console as the account owner by choosing Root user and entering your AWS account email address. On the next page, enter your password:
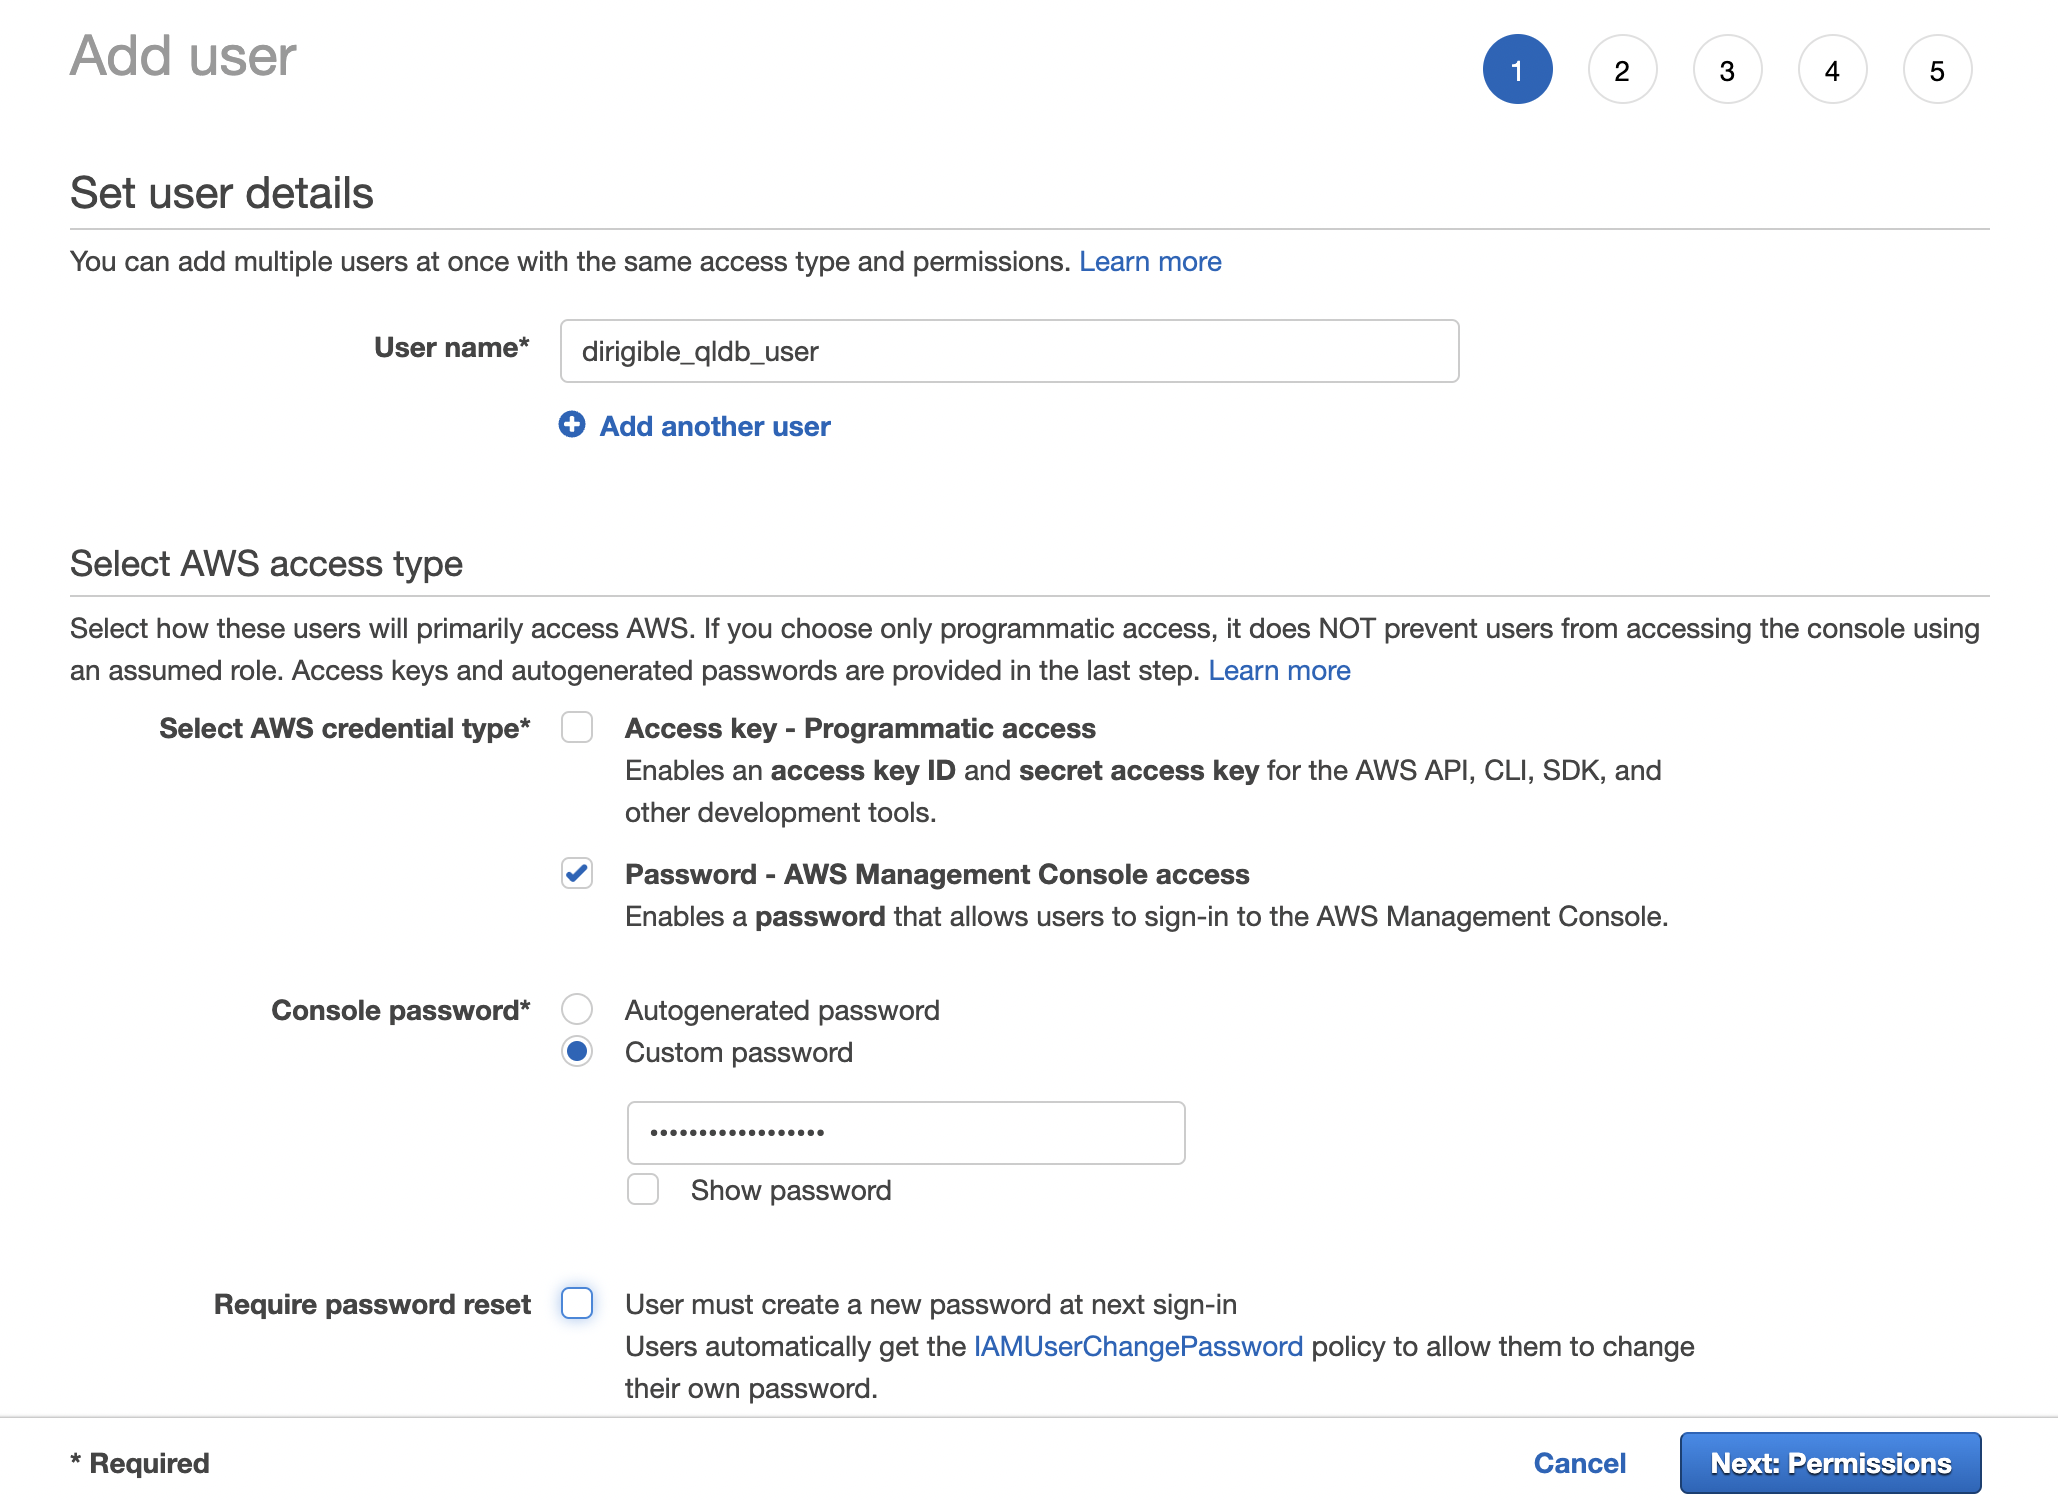
- In the navigation pane, choose Users and then choose Add users.
- For User name, enter
dirigible_qldb_user. - Select the check box next to AWS Management Console access. Then select
Password - AWS Management Console accessand then enter your new user password in the text box. - (Optional) By default, AWS requires the new user to create a new password when first signing in. You can clear the check box next to User must create a new password at next sign-in to allow the new user to reset their password after they sign in.
- Choose Next:
Permissions. - Under
Set permissions, chooseAdd user to group. - Choose
Create group.
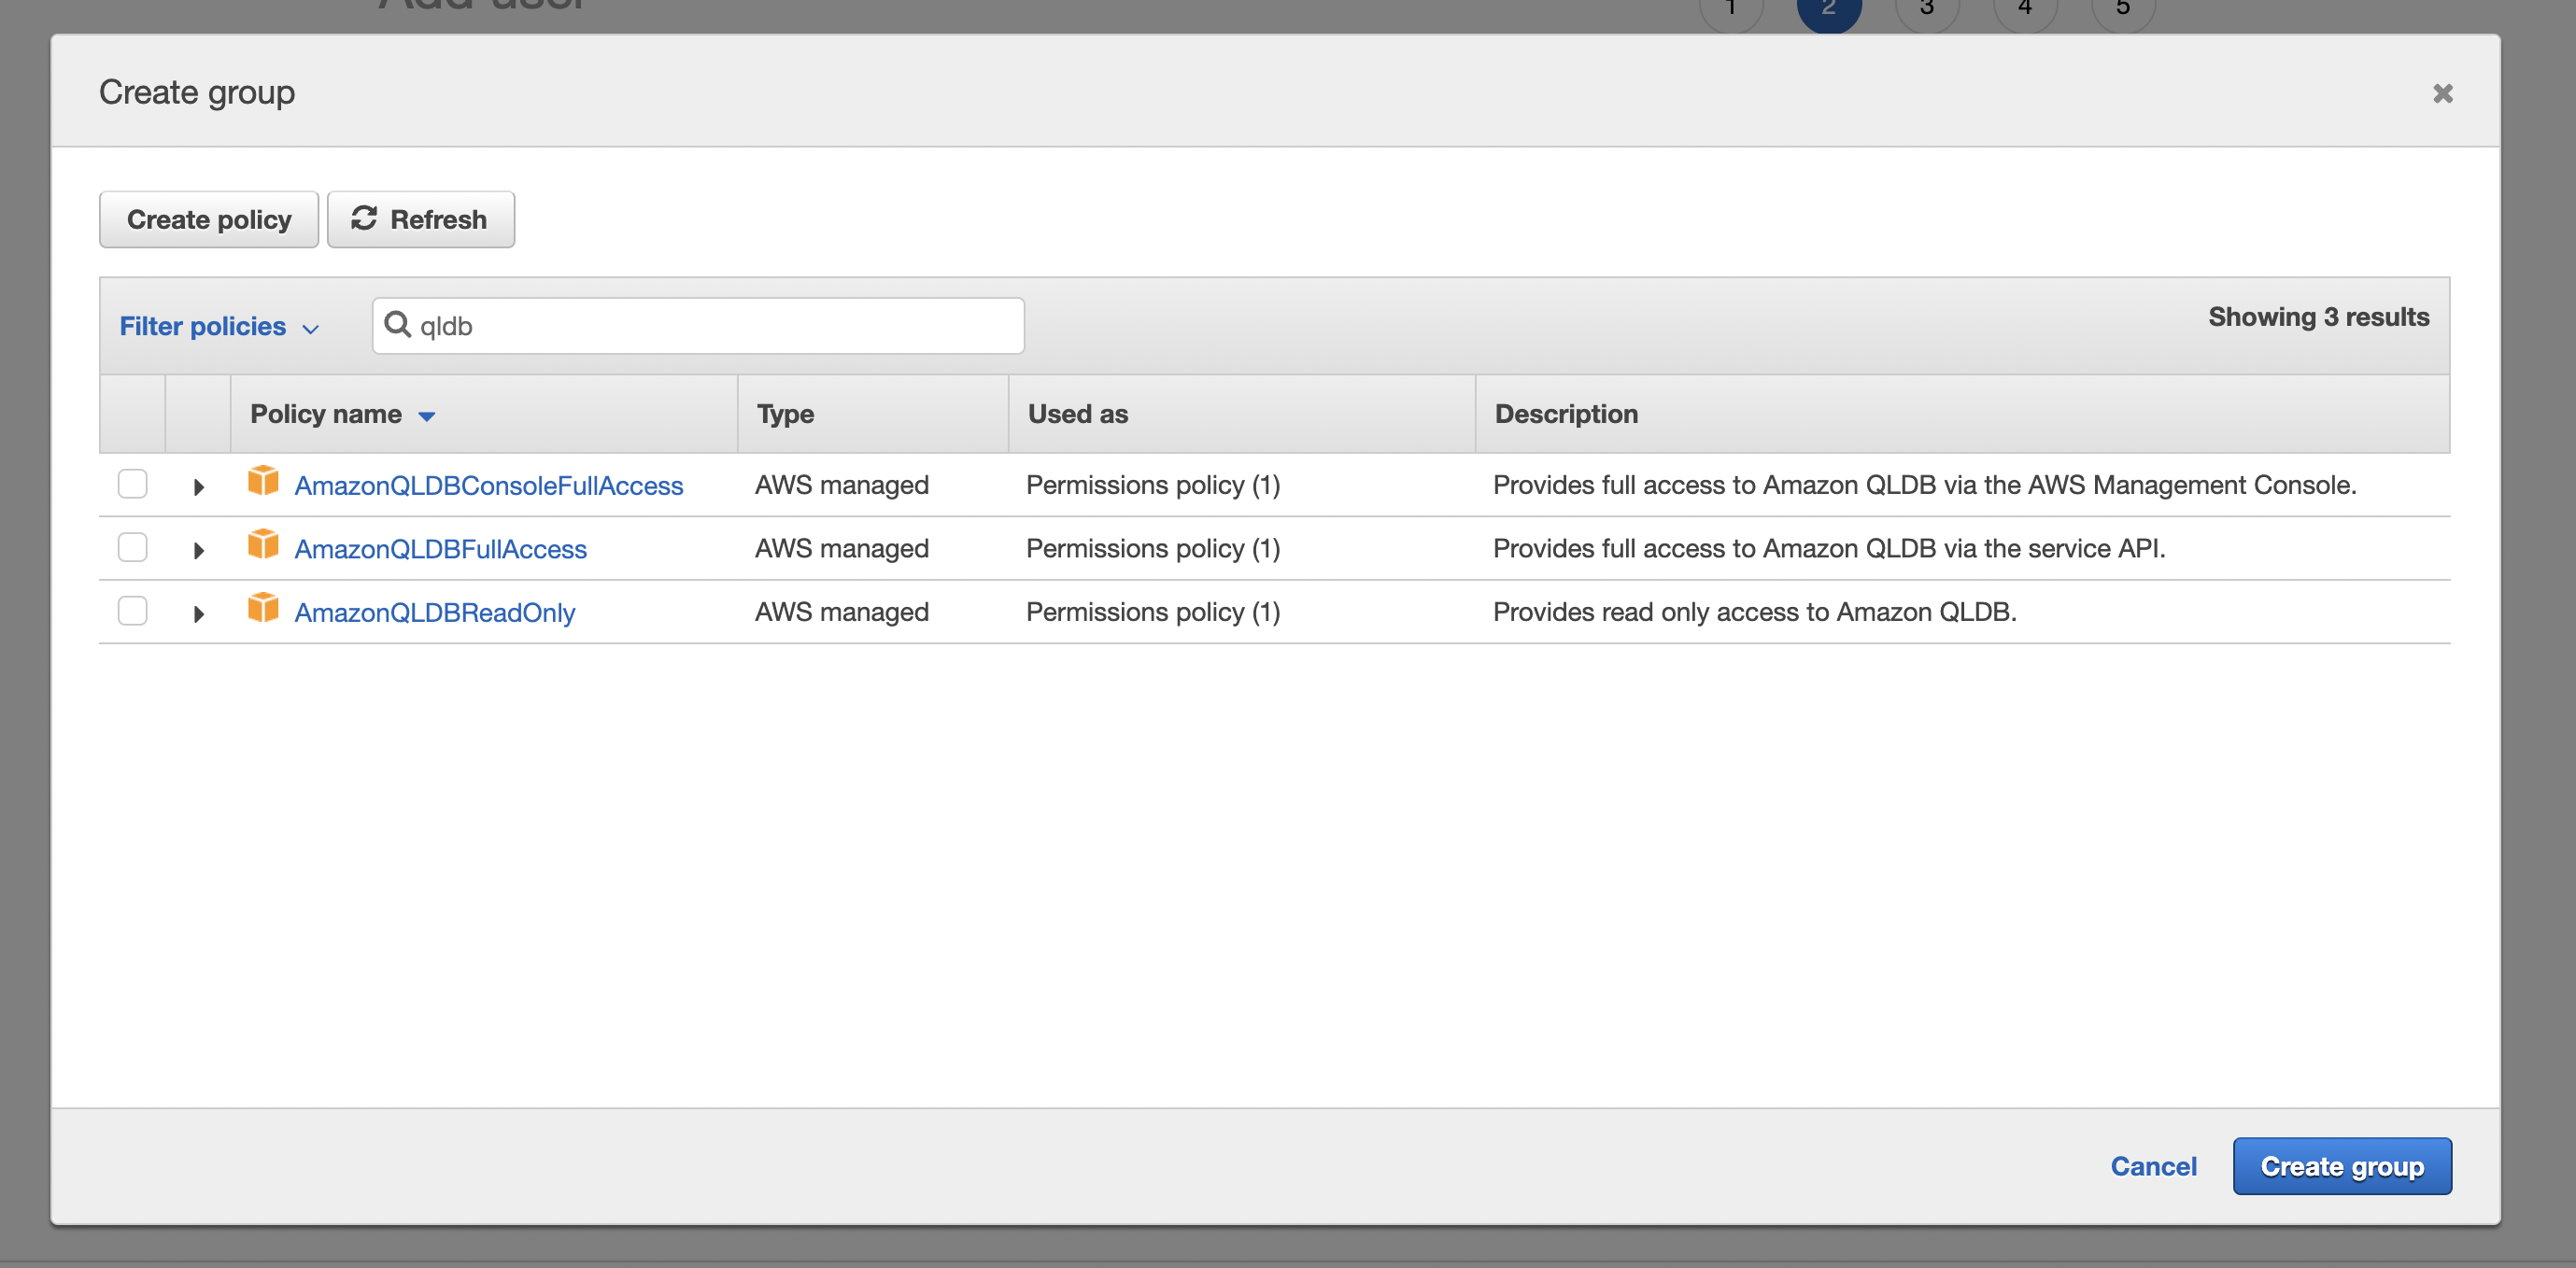
- In the Create group dialog box, for Group name enter
dirigible_qldb_group. - Choose in the
Filter policiesinput, search for the termqldb. - Put checkboxes on
AmazonQLDBReadOnly,AmazonQLDBFullAccessandAmazonQLDBConsoleFullAccess. - Then click on
Create group. - Back in the list of groups, select the
check boxfor your new group. ChooseRefreshif necessary to see the group in the list. - Choose
Next: Tags. - (Optional) Add metadata to the user by attaching tags as key-value pairs. For more information about using tags in IAM, see Tagging IAM entities in the IAM User Guide.
- Choose
Next: Reviewto see the list of group memberships to be added to the new user. When you are ready to proceed, chooseCreate user.
Note
You can read more in the AWS documentation How to Create an IAM User.
Get an IAM Access Key
- The Access Key is used by the QLDB Driver in Eclipse Dirigible to establish connections securely.
- Go back to the IAM console.
- In the navigation pane, choose
Users. - Click on the name of the user you created in the previous step.
- Choose the
Security credentialstab. - In the
Access keyssection, chooseCreate access key. - To view the new access key pair, choose Show. You will not have access to the secret access key again after this dialog box closes.
- Copy and remember the
Access key IDandSecret access keythey will be used in the next step.
Note
Your credentials will look something like this:
Access key ID: AKIAIOSFODNN7EXAMPLE
Secret access key: wJalrXUtnFEMI/K7MDENG/bPxRfiCYEXAMPLEKEY
You can read more in the AWS documentation How to Get an IAM Access Key.
Credentials and Region Setup
Setup the credentials and region on the machine you are running Eclipse Dirigible.
Note
Create a file ~/.aws/credentials, where the tilde character (~) represents your home directory:
[default]
region = eu-west-2
aws_access_key_id = <your_access_key_id>
aws_secret_access_key = <your_secret_access_key>
Replace (eu-west-2, your_access_key_id, your_secret_access_key) with your credentials from the last step.
Setup a Ledger
To create a ledger, sign in to the AWS Management Console, and open the Amazon QLDB console:
- In the navigation pane, choose
Getting started. - On the Create your first ledger card, choose Create Ledger.
- For
Ledger information– The Ledger name should be pre-populated withvehicle-registration, change that tomyTestLedger. - For
Permission mode- chooseStandard – (Recommended)(A permissions mode that enables access control with finer granularity for ledgers, tables, and PartiQL commands.) - For
Encrypt data at rest– chooseUse AWS owned KMS key(Use a KMS key that is owned and managed by AWS on your behalf. This is the default option and requires no additional setup.) - Tags – (Optional) Add metadata to the ledger by attaching tags as key-value pairs. You can add tags to your ledger to help organize and identify them. For more information, see Tagging Amazon QLDB resources.
- Choose
Create ledger. - In the list of Ledgers, locate
myTestLedgerand wait for the ledger's status to become Active.
Note
You can read more in the AWS QLDB documentation How to Setup a Ledger.
Build Custom Eclipse Dirigible stack with AWS QLDB support
To create a Custom Stack follow the steps here Custom Stack documentation.
- After that replace the content of the
releng/pom.xmlfile (described in the first step of the Custom Stack documentation) with:
<project xmlns="http://maven.apache.org/POM/4.0.0" xmlns:xsi="http://www.w3.org/2001/XMLSchema-instance" xsi:schemaLocation="http://maven.apache.org/POM/4.0.0 http://maven.apache.org/maven-v4_0_0.xsd">
  <modelVersion>4.0.0</modelVersion>

  <parent>
      <groupId>io.dirigible.custom.stack</groupId>
      <artifactId>custom-stack-parent</artifactId>
      <version>1.0.0-SNAPSHOT</version>
      <relativePath>../pom.xml</relativePath>
  </parent>

  <name>Custom Stack - Releng - Spring Boot</name>
  <artifactId>custom-stack-spring-boot</artifactId>
  <version>1.0.0-SNAPSHOT</version>
  <packaging>jar</packaging>

  <build>
      <plugins>
          <plugin>
              <groupId>org.springframework.boot</groupId>
              <artifactId>spring-boot-maven-plugin</artifactId>
              <version>${spring.boot.version}</version>
              <configuration>
                  <mainClass>io.dirigible.custom.platform.CustomPlatformApplication</mainClass>
              </configuration>
              <executions>
                  <execution>
                      <goals>
                          <goal>repackage</goal>
                      </goals>
                  </execution>
              </executions>
          </plugin>
      </plugins>
      <resources>
          <resource>
              <directory>src/main/resources</directory>
              <filtering>true</filtering>
          </resource>
      </resources>
  </build>

  <dependencies>

      <!-- Dirigible -->
      <dependency>
          <groupId>org.eclipse.dirigible</groupId>
          <artifactId>dirigible-server-spring</artifactId>
          <version>${dirigible.version}</version>
      </dependency>

      <!-- Dirigible ЕXT -->
      <dependency>
          <groupId>org.eclipse.dirigible</groupId>
          <artifactId>dirigible-ext</artifactId>
          <version>7.0.0-SNAPSHOT</version>
      </dependency>

      <!-- Platform -->
      <dependency>
          <groupId>org.slf4j</groupId>
          <artifactId>slf4j-api</artifactId>
          <version>${slf4j.version}</version>
          <scope>compile</scope>
      </dependency>
      <dependency>
          <groupId>ch.qos.logback</groupId>
          <artifactId>logback-core</artifactId>
          <version>${logback.version}</version>
          <scope>compile</scope>
      </dependency>
      <dependency>
          <groupId>ch.qos.logback</groupId>
          <artifactId>logback-classic</artifactId>
          <version>${logback.version}</version>
          <scope>compile</scope>
      </dependency>
      <dependency>
          <groupId>org.springframework.boot</groupId>
          <artifactId>spring-boot-configuration-processor</artifactId>
          <optional>true</optional>
          <version>${spring.boot.version}</version>
      </dependency>

  </dependencies>

</project>
Create Eclipse Dirigible Project with AWS QLDB
- Create a new Project.
- Add a
qldb-sample.jsorqldb-sample.mjsfile to the project. - Add the following content with an example usage of the QLDBRepository API to the file:
const QLDBRepository = require("qldb/QLDBRepository");
// 1. Create a repository for the ledger 'myTestLedger' that works with a table 'tableName'
const qldb = new QLDBRepository("myTestLedger", "tableName");
// 2. [OPTIONAL] Create the table as it doesn't exist in your ledger,
// on the next execution of this script - comment out this line or it will fail.
qldb.createTable();
// 3. Insert a JS Object as a record.
let inserted = qldb.insert({
    email: "test@mail.com",
    number: 123,
    status: false
});
// Notice: The inserted object now has a 'documentId' property,
// which is the id of the record generated by QLDB
console.log("Inserted entry: " + inserted);
// 4.1 Update a record
inserted.email = "q@mail.com";
inserted.number = 5;
inserted.status = false;
let updated = qldb.update(inserted);
console.log("Updated entry: " + updated);
// 4.2 [OPTIONAL] Update a record with an object
// let updatedRaw = qldb.update({
//     email: "text@mail.com",
//     number: 50000,
//     status: true,
//     documentId: "7ekJBB1FEm1EmhJBqH0WLX"
// });
// Notice: Unlike insertion where the 'documentId' is generated by QLDB,
// in 'update' the object must have a 'documentId' property defined
// with value - a valid documentId of an entry in your table.
// 5. Get all current records in the repository.
let allRecords = qldb.getAll();
console.log("allRecords: " + allRecords);

// 6.1 Delete a record
let deletedId = qldb.delete(updated);
console.log("Deleted entry with id: " + deletedId);
// 6.2 [OPTIONAL] Delete a record by ID
// deletedId = qldb.delete(updated.documentId);
// console.log("Deleted entry with id: " + deletedId);
// 7. Get array with all transactions for the table
let transactionHistory = qldb.getHistory();
console.log("Transaction History:" + transactionHistory);
// 8. [OPTIONAL] Drop the table
// qldb.dropTable();
// Notice: In QLDB dropping a table simply inactivates it,
// you can reactivate a table that you have dropped by running
// an SQL UNDROP statement in PartiQL
import { QLDBRepository } from "sdk/qldb"
// 1. Create a repository for the ledger 'myTestLedger' that works with a table 'tableName'
const qldb = new QLDBRepository("myTestLedger", "tableName");
// 2. [OPTIONAL] Create the table as it doesn't exist in your ledger,
// on the next execution of this script - comment out this line or it will fail.
qldb.createTable();
// 3. Insert a JS Object as a record.
let inserted = qldb.insert({
    email: "test@mail.com",
    number: 123,
    status: false
});
// Notice: The inserted object now has a 'documentId' property,
// which is the id of the record generated by QLDB
console.log("Inserted entry: " + inserted);
// 4.1 Update a record
inserted.email = "q@mail.com";
inserted.number = 5;
inserted.status = false;
let updated = qldb.update(inserted);
console.log("Updated entry: " + updated);
// 4.2 [OPTIONAL] Update a record with an object
// let updatedRaw = qldb.update({
//     email: "text@mail.com",
//     number: 50000,
//     status: true,
//     documentId: "7ekJBB1FEm1EmhJBqH0WLX"
// });
// Notice: Unlike insertion where the 'documentId' is generated by QLDB,
// in 'update' the object must have a 'documentId' property defined
// with value - a valid documentId of an entry in your table.
// 5. Get all current records in the repository.
let allRecords = qldb.getAll();
console.log("allRecords: " + allRecords);

// 6.1 Delete a record
let deletedId = qldb.delete(updated);
console.log("Deleted entry with id: " + deletedId);
// 6.2 [OPTIONAL] Delete a record by ID
// deletedId = qldb.delete(updated.documentId);
// console.log("Deleted entry with id: " + deletedId);
// 7. Get array with all transactions for the table
let transactionHistory = qldb.getHistory();
console.log("Transaction History:" + transactionHistory);
// 8. [OPTIONAL] Drop the table
// qldb.dropTable();
// Notice: In QLDB dropping a table simply inactivates it,
// you can reactivate a table that you have dropped by running
// an SQL UNDROP statement in PartiQL
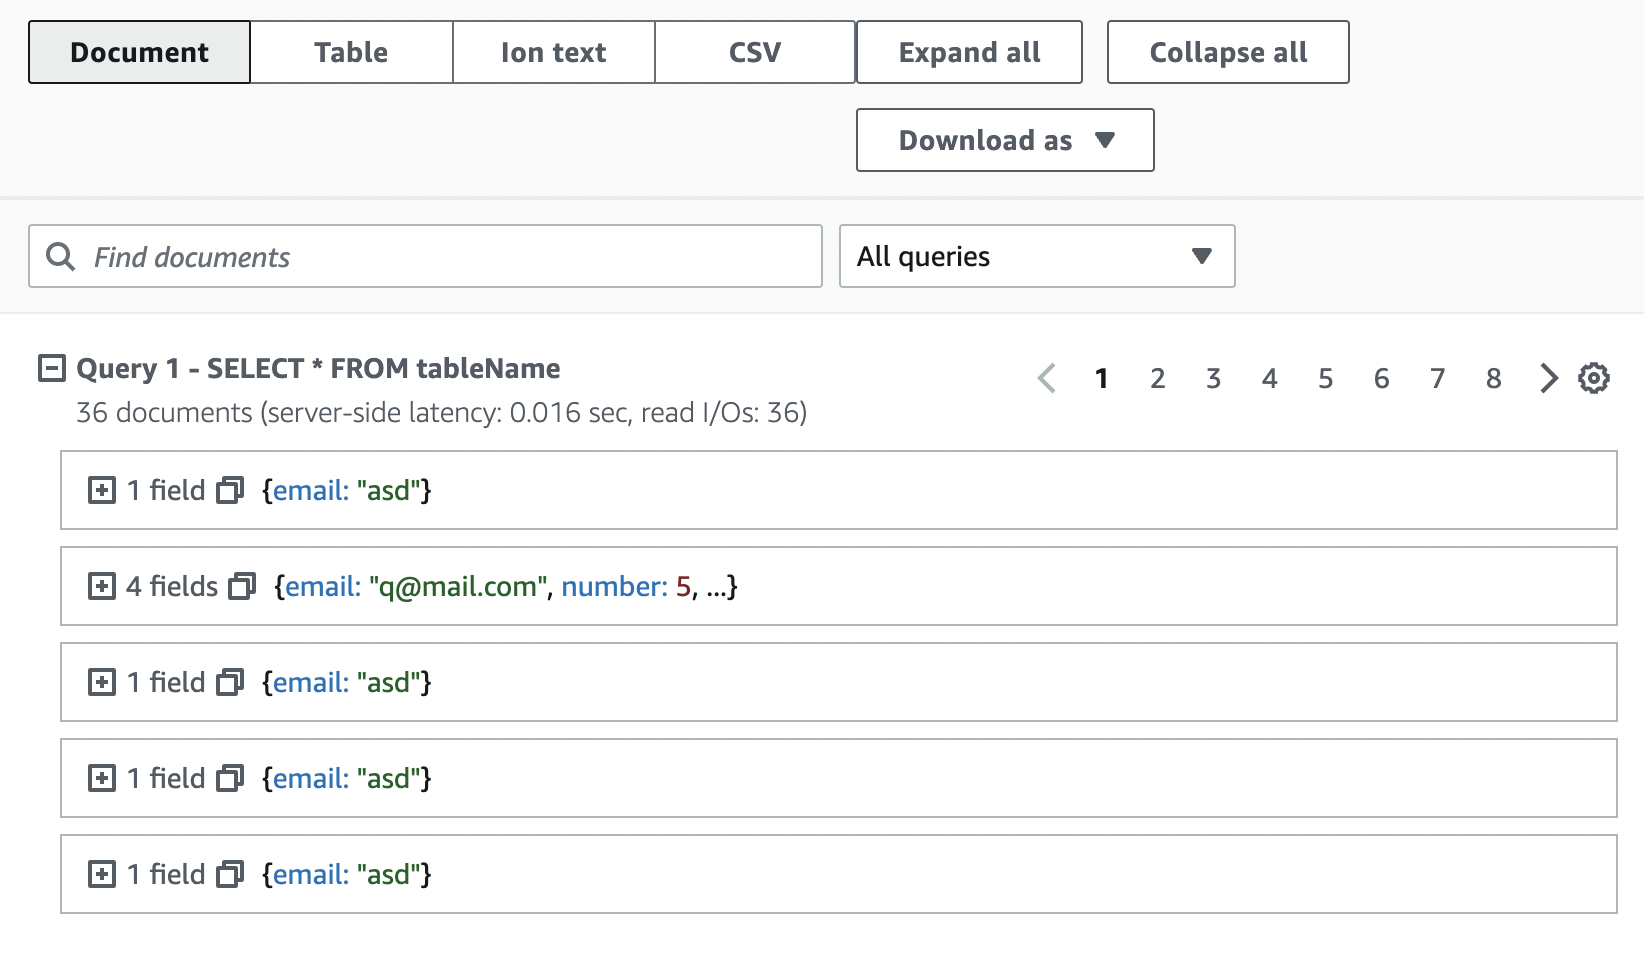
(Optional) Manually Run PartiQL queries against your ledger
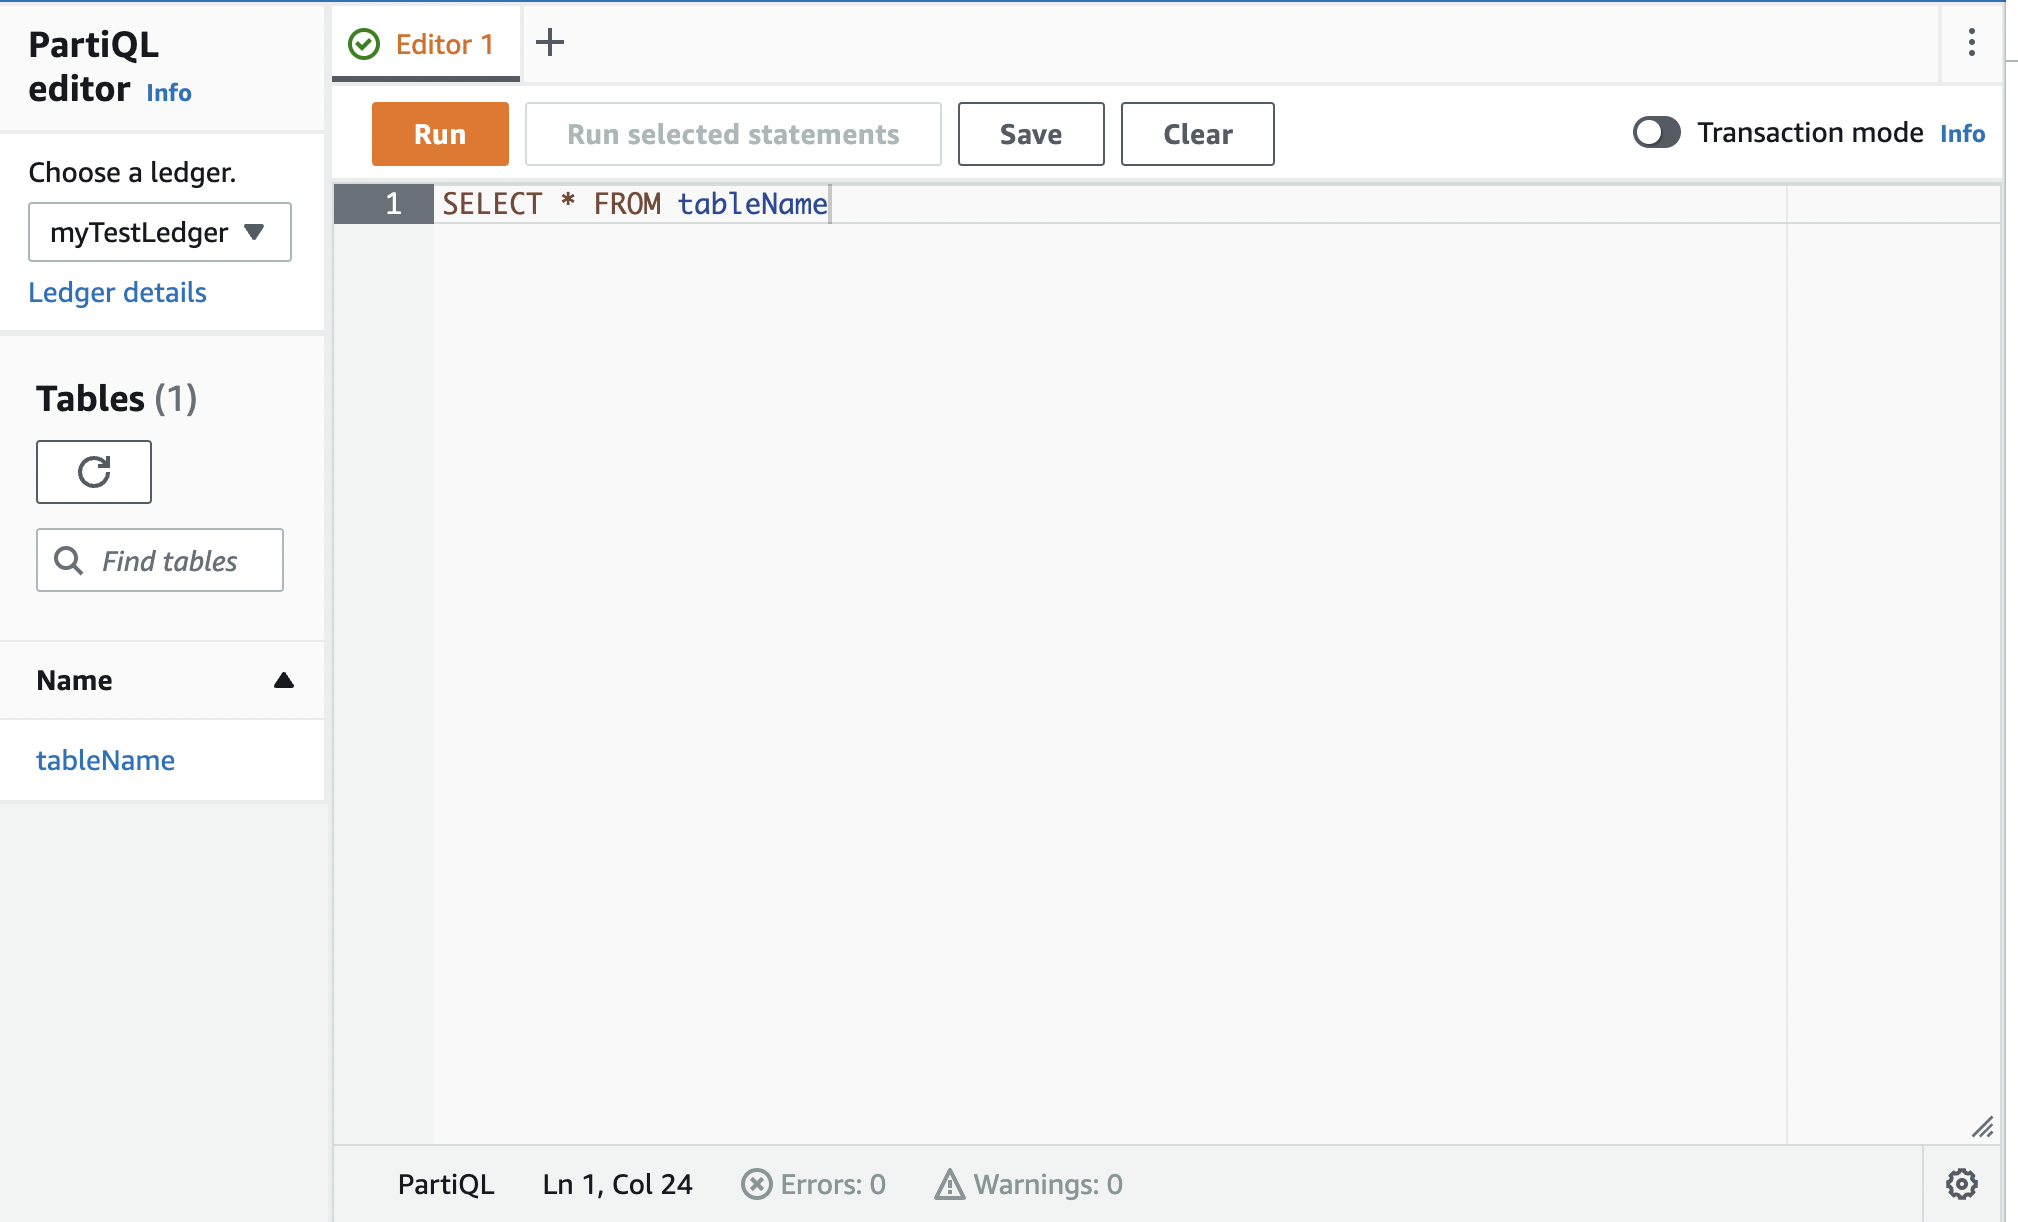
- Sign in to the AWS Management Console, and open the Amazon QLDB console.
- In the navigation pane choose
PartiQL editor. - In the editor's
Choose a ledgerdropdown selectmyTestLedger. - You can now write and execute queries to your database manually.
Note
This can be useful if you want to create, delete or restore deleted tables. Read more at Getting started with PartiQL for DynamoDB.